
Last Summer I got the incredible opportunity to travel to Kenya with some people from my church. We went for 2 weeks to be exposed to the culture and to minister to some children in orphanages there that our church supports. 
It was an incredible time that changed so many things about how I want to live my life. The main orphanage that we spent most of our time in was called Eden Orphanages. It is a small orphanage that was started by a farmer from Waller, Texas.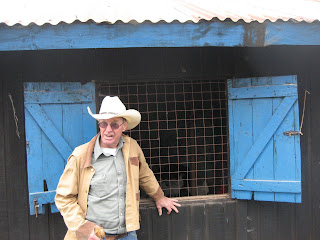 Mike and his wife Sylvia have spent the better part of their marriage investing in the lives of children half a world away. Mike, despite his recent battle with brain tumors, still makes bi-annual trips to Africa to oversee the orphanages' operation. He is using his knowledge of farming to help teach the kids and workers how to plant vegetables, raise cattle, rabbits and chickens. By doing this, the orphanage is virtually self-sustainable. Whatever is not used for the children, is sold to pay the salaries of the matrons and other workers.
I was in awe of these kids and after hearing some of their stories of where they came from and the conditions they were living in, I couldn't believe they still had these beautiful smiles! I truly saw the joy of Lord in them.

As much as I wanted to go back this year, my job would not allow it this summer. I wanted to send a little something for the girls and had an idea! The girls over there are not allowed to have long hair when attending school. In fact, they have to shave their head because of lice, lack of water and other factors. I noticed that some of the girls had these little head bands, just plain fabric they would tie around their heads. I figured I could do something like that, but add some girly-ness to them. What little girl wouldn't love a colorful, flowered headband?!
The orphanage has taken in a few more girls since I was there so I had to make 36 of them. It was a labor of love, but one that will hopefully bring a little smile to their faces.
I purchased the cloth headbands and started off by cutting 36 circles out of fabric scraps I had.

It was an incredible time that changed so many things about how I want to live my life. The main orphanage that we spent most of our time in was called Eden Orphanages. It is a small orphanage that was started by a farmer from Waller, Texas.
Mike and his wife Sylvia have spent the better part of their marriage investing in the lives of children half a world away. Mike, despite his recent battle with brain tumors, still makes bi-annual trips to Africa to oversee the orphanages' operation. He is using his knowledge of farming to help teach the kids and workers how to plant vegetables, raise cattle, rabbits and chickens. By doing this, the orphanage is virtually self-sustainable. Whatever is not used for the children, is sold to pay the salaries of the matrons and other workers.I was in awe of these kids and after hearing some of their stories of where they came from and the conditions they were living in, I couldn't believe they still had these beautiful smiles! I truly saw the joy of Lord in them.
As much as I wanted to go back this year, my job would not allow it this summer. I wanted to send a little something for the girls and had an idea! The girls over there are not allowed to have long hair when attending school. In fact, they have to shave their head because of lice, lack of water and other factors. I noticed that some of the girls had these little head bands, just plain fabric they would tie around their heads. I figured I could do something like that, but add some girly-ness to them. What little girl wouldn't love a colorful, flowered headband?!
The orphanage has taken in a few more girls since I was there so I had to make 36 of them. It was a labor of love, but one that will hopefully bring a little smile to their faces.
I purchased the cloth headbands and started off by cutting 36 circles out of fabric scraps I had.

Sew around the circle with a basic needle and thread
 When you get all the way around, pull the thread to gather the fabric together and then sew the middle to secure it.
 Sew the flower onto the headband. I just placed it on the seam that was already on the headband.
 To add some more fun, I hot-glued a button in the middle.
 I then packaged them all up and off they go with the team of people leaving in a few days!
 They look really fun hanging on my hall mirror! I can't wait to see how they look on all those precious heads! Hopefully I will get some pictures!


 This took me 4 hours on Sunday. Hopefully the rest won't be so bad!
![[image[7].png]](http://lh6.ggpht.com/_vswDWGRlsPw/TdHa8DuEZdI/AAAAAAAANWo/7x56MPTkr-g/s1600/image%5B7%5D.png)


