Search This Blog

Showing posts with label fabric. Show all posts

Tuesday, January 10, 2012

Monogrammed Art


This is a different take on my previous fabric art.

  crafts 003-1 

For this I used Steam-a-Seam to adhere the monogram onto the base fabric. Then I stitched around each letter with a black zig-zag stitch to help it stand out a little.

I just printed out the monogram and then traced it onto the steam a seam backing backwards.  I am sure there is a more exact way to do this, but I have never been one for exactness.crafts 001-1

This was actually a gift for a dear friend of mine who got engaged this weekend.  It was waiting for them when they arrived at the “just engaged” party!

crafts 006-1

Her new last initial and there first initials. The maroon and white colors are a nod to Texas A&M!  A school near and dear to both of them (and me)!

crafts 004-1

Congratulations Mark and Dean-na! I am so excited for you guys!

crafts 022

Monday, January 2, 2012

Make a frame, make some art!


I know some girls get things like clothes and makeup for Christmas, but for the past few years, my Dad has been stocking me up with awesome tools! It started with a basic tool kit, but as the years have gone on, I guess I have proven myself worthy of the big stuff!

This year I received my very own Compound Miter Saw! Isn't it lovely?

I'll admit, that blade is a little scary, but it sure does make this project I have been working on so much easier!

I have been making a lot of these fabric wall hangings and I need frames for them to wrap around. Theses are so cheap, and take no time at all now that I don't have to manually saw each of the boards!
Just take a 1X2 piece of wood, figure out the size you want your frame to be and make 45 degree cuts. Once you have your 4 edges, just staple them together at the corners. I used 2 staples on each corner, then flip it over and put 2 more staples again at each corner. Pretty simple and very sturdy.


Now, on to the fun stuff!

These fabric wall hangings are so much fun and the possibilities are endless. What I love about this is that you don't have to use a lot of fabric so you can raid the remnant section at Hobby Lobby and find all sorts of fun fabric without paying a ton and having a lot left over.
I just cut out whatever shape I want, lay that over a contrasting fabric, sew around the edges and then add some detail! Once everything is sewn on, just stretch it across your frame and staple it to the back.

Here are some examples. I really love them and they make great gifts!


Here are some up close


And here are some others I did ...


Posted by Picasa

Saturday, July 9, 2011

Headbands for Orphans

Last Summer I got the incredible opportunity to travel to Kenya with some people from my church. We went for 2 weeks to be exposed to the culture and to minister to some children in orphanages there that our church supports.

It was an incredible time that changed so many things about how I want to live my life. The main orphanage that we spent most of our time in was called Eden Orphanages. It is a small orphanage that was started by a farmer from Waller, Texas. 
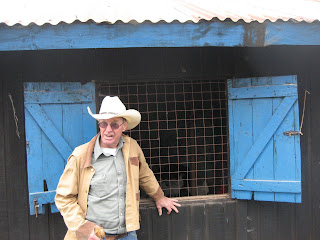
Mike and his wife Sylvia have spent the better part of their marriage investing in the lives of children half a world away. Mike, despite his recent battle with brain tumors, still makes bi-annual trips to Africa to oversee the orphanages' operation. He is using his knowledge of farming to help teach the kids and workers how to plant vegetables, raise cattle, rabbits and chickens. By doing this, the orphanage is virtually self-sustainable. Whatever is not used for the children, is sold to pay the salaries of the matrons and other workers.

I was in awe of these kids and after hearing some of their stories of where they came from and the conditions they were living in, I couldn't believe they still had these beautiful smiles! I truly saw the joy of Lord in them.


As much as I wanted to go back this year, my job would not allow it this summer. I wanted to send a little something for the girls and had an idea! The girls over there are not allowed to have long hair when attending school. In fact, they have to shave their head because of lice, lack of water and other factors. I noticed that some of the girls had these little head bands, just plain fabric they would tie around their heads. I figured I could do something like that, but add some girly-ness to them. What little girl wouldn't love a colorful, flowered headband?!

The orphanage has taken in a few more girls since I was there so I had to make 36 of them. It was a labor of love, but one that will hopefully bring a little smile to their faces.

I purchased the cloth headbands and started off by cutting 36 circles out of fabric scraps I had.


Sew around the circle with a basic needle and thread


When you get all the way around, pull the thread to gather the fabric together and then sew the middle to secure it.


Sew the flower onto the headband. I just placed it on the seam that was already on the headband.

To add some more fun, I hot-glued a button in the middle.


I then packaged them all up and off they go with the team of people leaving in a few days!


They look really fun hanging on my hall mirror! I can't wait to see how they look on all those precious heads! Hopefully I will get some pictures!


Posted by Picasa

Thursday, March 17, 2011

Fun with Flowers!

I used to have this plain-jane lamp in my bedroom. There was really nothing special about it other than I got it from a good friend that was moving and the inside of the lamp shade had a little leopard print thing going for it. Other than that, it was just black: Black base, Black shade, just BLACK. And I have nothing in my room that's black so it stuck out- and not in a good way.

So, after some green spray paint, burlap, hot glue and a few fun flowers, I now have an awesome lamp that I love to show off!


I added this little fabric ruffle on the bottom to hide where the burlap was uneven.

I just stuck the flowers on with tape so I can change it if I want to...

The lamp looks great next to my new chair (still deciding if I'm keeping that fabric on the cushion) and now I have a great little reading spot in my bedroom!

*******

I got a little carried away making those flowers, so I used some extras on a wreath for the front door. I had been wanting to make one of those yarn wreaths for awhile. It was super easy and I just pinned the flowers on so I can change it out as often as I like!
I picked the green ribbon because its what I had lying around, but then realized it's St. Patrick's Day- Bonus!


I think I'm done with fabric flowers for awhile, but I sure do like them...


* I link my projects to the following amazing blogs whose links you can find on my side bar
- Todays creative Blog
- Someday Crafts
- Somewhat simple